


First things first,
Let's start with basic definition. So,
What is an OS?
An OS is a system software which gives platform to various application to run on your computer.Or more definatively we can say - An operating system acts as an intermediary between the user of a computer and the computer hardware.The purpose of an OS is to provide an environment in which a user can execute programs in a convinient and efficient manner.
An OS manages resources and gives them to various programs when required.
Here we are going to develop a small OS whose work is:
- boot the machine
- recognize hardware
- print some text to screen
- So let's setup the environment first.
What you are going to need?
- Any Windows/Linux Machine
- An editor (I used Visual Studio Code)
- GNU/GCC compiler collection
That's it, you are ready now.Ohh i forgot to mention, you must have a lil knowledge of c++ too;
So here a basic diagram which represents communication between ROM, CPU and RAM.
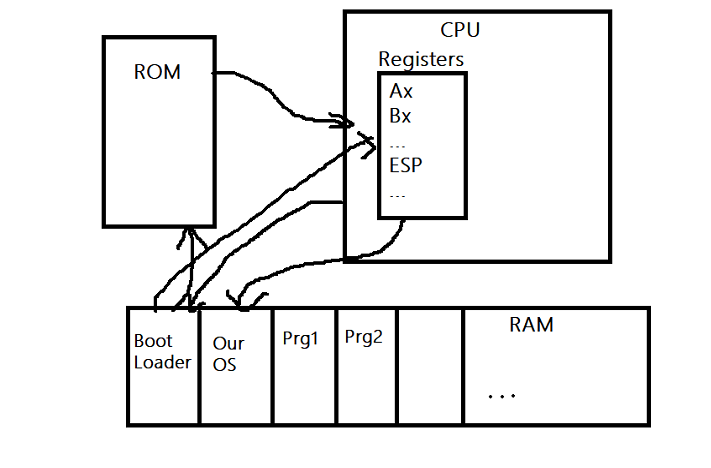
Ok so first objective is to boot the system using our OS. So, let's see how we will do that...
We know we are using c++, but theres a problem now ...! What Problem?
The thing is when we run a c++ program, it is expected that stack pointer (ESP) will be given by the environment.
As we are making an OS, there is no one to provide stack pointer to our program ... :(
Hey wait, we can do one thing....what if we use some program in other language to give us the stack pointer....
"What you saying Shivam I cannot Understand !!! But it sounds good."
We will use a little bit of Assembly Language too : ) Great!
Ok, let's start coding now...
Here comes the first file
types.h
- it will contain all the differnt kind of datatypes that we will use
#ifndef __TYPES_H
#define __TYPES_H

    typedef char                     int8_t;
    typedef unsigned char           uint8_t;
    typedef short                   int16_t;
    typedef unsigned short         uint16_t;
    typedef int                     int32_t;
    typedef unsigned int           uint32_t;
    typedef long long int           int64_t;
    typedef unsigned long long int uint64_t;

#endif
Now we come to driver code...
kernel.cpp
#include "types.h"

void printf(char* str)
{
    static uint16_t* VideoMemory = (uint16_t*)0xb8000;

    for(int i = 0; str[i] != '\0'; ++i)
        VideoMemory[i] = (VideoMemory[i] & 0xFF00) | str[i];
}


typedef void (*constructor)();
extern "C" constructor start_ctors;
extern "C" constructor end_ctors;
extern "C" void callConstructors()
{
    for(constructor* i = &start_ctors; i != &end_ctors; i++)
        (*i)();
}


extern "C" void kernelMain(const void* multiboot_structure, uint32_t /*multiboot_magic*/)
{
    printf("Hello Everyone Welcome to my first os");

    while(1);
}- as we cannot use any predefined library, we have to define our own printf
- OK so we done with half of the part, now let's solve that stack pointer (ESP) problem,
- we will be writing a small code in Assembly......Intresting huh... : )
As it is loading the stack pointer let's name it loader.s
loader.s
.set MAGIC, 0x1badb002
.set FLAGS, (1<<0 | 1<<1)
.set CHECKSUM, -(MAGIC + FLAGS)

.section .multiboot
    .long MAGIC
    .long FLAGS
    .long CHECKSUM


.section .text
.extern kernelMain
.extern callConstructors
.global loader


loader:
    mov $kernel_stack, %esp
    call callConstructors
    push %eax
    push %ebx
    call kernelMain


_stop:
    cli
    hlt
    jmp _stop


.section .bss
.space 2*1024*1024; # 2 MiB
kernel_stack:
whoopppppp..... 1 more little problem now -_-!
- if we compile two seperate codes....then how we will manage to link them together .....hmmmmm
- ok i got one !dea let's write a small linker script
- this will join the compiled code .... : D
linker.ld
ENTRY(loader)
OUTPUT_FORMAT(elf32-i386)
OUTPUT_ARCH(i386:i386)

SECTIONS
{
  . = 0x0100000;

  .text :
  {
    *(.multiboot)
    *(.text*)
    *(.rodata)
  }

  .data  :
  {
    start_ctors = .;
    KEEP(*( .init_array ));
    KEEP(*(SORT_BY_INIT_PRIORITY( .init_array.* )));
    end_ctors = .;

    *(.data)
  }

  .bss  :
  {
    *(.bss)
  }

  /DISCARD/ : { *(.fini_array*) *(.comment) }
}
Hush every thing is completed......we just have to make iso file now from the compiled code
- we have object files.
- we can make binary files from them
- and then we can make .iso type file i.e. Image file of our OS.
Use the makefile script below
makefile
# sudo apt-get install g++ binutils libc6-dev-i386
# sudo apt-get install VirtualBox grub-legacy xorriso

GCCPARAMS = -m32 -fno-use-cxa-atexit -nostdlib -fno-builtin -fno-rtti -fno-exceptions -fno-leading-underscore
ASPARAMS = --32
LDPARAMS = -melf_i386

objects = loader.o kernel.o


%.o: %.cpp
	gcc $(GCCPARAMS) -c -o $@ $<

%.o: %.s
	as $(ASPARAMS) -o $@ $<

mykernel.bin: linker.ld $(objects)
	ld $(LDPARAMS) -T $< -o $@ $(objects)

mykernel.iso: mykernel.bin
	mkdir iso
	mkdir iso/boot
	mkdir iso/boot/grub
	cp mykernel.bin iso/boot/mykernel.bin
	echo 'set timeout=0'                      > iso/boot/grub/grub.cfg
	echo 'set default=0'                     >> iso/boot/grub/grub.cfg
	echo ''                                  >> iso/boot/grub/grub.cfg
	echo 'menuentry "My Operating System" {' >> iso/boot/grub/grub.cfg
	echo '  multiboot /boot/mykernel.bin'    >> iso/boot/grub/grub.cfg
	echo '  boot'                            >> iso/boot/grub/grub.cfg
	echo '}'                                 >> iso/boot/grub/grub.cfg
	grub-mkrescue --output=mykernel.iso iso
	rm -rf iso


install: mykernel.bin
	sudo cp $< /boot/mykernel.bin
Note : You firstly have to run your os manually on Virtual Box or you can just load it to pendrive and run.
In the terminal just run "make mykernel.iso" command and thats it...you will find your iso file in folder now you can use this file in Virtual box or make a bootable pendrive from it and try to run it.
Hurray....you made your very own OS by yourself.
If you face any problem, don't hesitate to contact. I am always availabe for my LeetCode community members
I'm sharing my repository link, you can cross check it if needed. Link - https://github.com/Shiv2101/OS
Hope you enjoyed making your very own OS. Highfive🙏